Streamline Your Business With Retail Plus Point Of Sale / POS Software
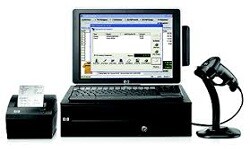
Our store proven POS software makes superior sales and inventory management a breeze. Retail Plus is the foundation for a complete point of sale system and retail management suite. It makes everyday decisions easier and provides a faster, easier customer checkout. We also support all the optional hardware like a cash drawer, receipt printer, scanner, barcode printer, customer display, and payment card terminal. Or create a POS system just by adding a computer and monitor. It fits into all types of settings, whether you're a bricks and mortar small business or an eCommerce vendor that needs to process orders at lightspeed.
Use Our Point Of Sale System Free
Are you just starting out with a small business? We want to help. Start your retail operation with our POS software and do not pay us anything until it’s growing. Even then, our pricing is very affordable.
This POS Software has been a life-saver for me and I don’t have to hire a computer genius to take care of it.
I have looked at a lot of POS software out there
– and I mean a lot –
and I liked Retail Plus the best.
Watch Our Short Introductory Video
Retail Plus is an affordable, feature-rich POS software package designed for small businesses. Its main features include:
-
All point-of-sale system functions
-
Customer and supplier database
-
Inventory control including purchase orders
-
Card processing integration and invoicing
-
Ecommerce links to your online shopping cart
-
Superior telephone support and free tutorials
-
The free trial comes preloaded with sample inventory so you can try it without any long setups

Simplicity
Most POS systems involve complex setups and lots of staff training. Our retail point of sale software removes these barriers with an easy-to-use system. We back that up with unlimited tech support and live one-on-one tutorials at no extra cost.

Years of Experience
With 25 years in the field, Retail Plus has evolved into a cutting edge POS system while ease of use remains a priority. It delivers fast checkouts, accurate inventory control, and instant up-to-the-minute reports. This leads to bigger profits and more time to focus on growing your business.

Our Commitment to You
We will provide award-winning POS software that delivers the right mix of simplicity and features at an affordable price. We will give you unlimited setup assistance and personal tutorials until you are satisfied. We will deliver ongoing tech support and program updates for key functions to keep you competitive.

Free Trial
You can get our retail POS system up and running in five minutes when you download the easy-to-use installer. A sample inventory is already included, so you can try it without any long setups. Call 888-272-4874 with your questions and get hassle-free advice and support. Just to make it extra easy, we can even install the retail POS for you via remote connection.

Save Time
Speed up your search for the right POS software right now by getting a free guided tour of Retail Plus POS Software. This is a live one-on-one tutorial via the web with one of our friendly support staff to help set up your retail environment. Call us now to schedule a time and we can get to work showing you the best, most affordale point of sale system for your business.
... and the BEST Part
You can set up your own point of sale system and save a bundle of money. It is much easier than you may think and our excellent support techs are here to help cover every detail until you are completely satisfied with your installation.

For credit, debit and gift card processing we support Global Payment Systems.
Our users love the superior support they get from Global Payments. Call us for more details at 888-272-4874.
Use Any Windows PC Or Tablet.
Current Topics Of Interest Include:
1 – Building your own POS system.
2 – POS software price comparison.
3 – Dealing with suppliers.
Get Started Now
Award Winning Point of Sale SoftwareYou can download and install Retail Plus POS software in a matter of minutes. There is sample data already in the system, so you can try it for any business type without any long setups. You can also call us to schedule a free live remote tutorial to help you get started. Call 888-272-4874. WhatsApp calls are welcome at 1-250-538-2150.
Latest New Features
– Integrate your webshop with your storefront sales & inventory.
– Switch easily between receipts and full invoices.
– New accounting exports.
– New supplier sales reports.
– Display the total margin on a transaction at the register.
– Track merchandise authorizations for returns and refunds.
– New card processing options and add-ons.
Welcome Latest New Users
– Simplicity Cycle
– D’Chavez Jewellery
– Poolmart Plus
– Due North Maternity & Baby
– Royalty Pool International
– Gone Country
– Latin Depot
– Metzger Landscaping
– Back Country Convenience
– Quay Necessities
– Play Room Toys
As a business owner, you already know how important a point of sale system (POS) is for your operation. It enables you to save both time and money when checking out customer’s sales, organizing and tracking your inventory, monitoring your cash flow, ordering & receiving new stock, getting invoices out, preparing accounting reports, and much, much more.
POS systems are certainly a crucial part of every small business for taking orders, processing payments and converting sales data into merchandising decisions that help the businesses to grow. A good POS system reduces the time needed to complete administrative and record-keeping tasks which gives you more time to focus on your customer’s needs and wishes. And through features like automated suggestion selling and rewards points, a positive customer experience will promote confidence and loyalty.
If you are a new business owner or are trying to learn more about POS systems, you may be asking yourself, “What exactly constitutes a good POS system?”
What is a POS system?
A POS system is no longer just a smart cash register. It has evolved way beyond the basic functions of checking out customers’ purchases although this remains a crucial part of the all-important customer experience. Checkouts need to be fast and simple with no unexpected hitches and hold-ups. The system also includes a host of features and functions that streamline the long list of tasks that a retailer has to deal with in order to remain organized and focused on the goal which is attracting and retaining clients. A good POS system constitutes a retail management system that helps ensure all the essentials are covered – everything from managing suppliers and inventory to keeping the accountant happy.
A basic POS system will include a touchscreen monitor, an automatic cash drawer, a barcode scanner, and a printer receipt. More advanced systems, however, will also include weight scales, portable inventory counters, customer displays, and barcode printers, among other high-quality tech.
In addition to these hardware parts, the best POS systems will have superior POS software that can help with payment processing, inventory management, eCommerce integration, and sales reports generation. It should also have the means to run a loyalty program.
POS software like Retail Plus will help establish a solid ground for your scalable business. Our Point of Sale software will keep your cashiers and managers informed, sales increasing, and even help improve your email marketing strategies.
What are the differences between paid and free POS systems?
In the case of Retail Plus, the free and paid versions are one and the same except for data capacity. This means that the free version handles up to 150 inventory items and 150 client records. The paid version has no limits at all. This allows us to help you in the start-up phase of your business with free software so you can spend the money on other essentials.
Later, when the business has grown Retail Plus can be registered and your business can take off without having to migrate to another system. We want you to focus on growing your operation without worrying about the expense of a POS system.
Here’s why Retail Plus is perfect for your business.
A quality POS software like Retail Plus offers free services for any small business looking for scalability and an easy way to process payments. It can also help your business improve analytics and sales metrics by generating reports for your bookkeeper and accountant. .
Moreover, your business can benefit from Retail Plus’s wide array of features such as multiple security levels, payroll management, staff time-clock, and debit and credit card payments. You also get gift card payment processing, software integrations, sales suggestions, product photos, and multi-lane accessibility.
Additionally, you get a client database for customer relations management. Our POS software also offers individual client pricing and tax setups, detailed purchase history, custom orders, and reward points. You can also quickly search for customers in the database and sort their transactions by purchase dates.
Furthermore, you get inventory management features that help you create and track purchase orders, sales promotions, and product serial numbers. You can also track inventory that goes into gift baskets and kits.
Retail Plus POS software comes with customer support and software updates. Our system can help you meet your customers’ expectations while keeping your suppliers, banker, accountant, and sales tax authorities happy.
Contact Us via 888-272-4874 or Email us with this form to take your POS solution to the next level:
What does a point of sale (POS) system do?
A point of sale (POS) system is a computer and software setup that provides retailers with key mission-critical functions to help run their businesses. It is an indispensable retail management tool. The main functions are:
1 – Inventory Control – keeps track of stock and your orders to suppliers.
2 – Customer Checkout – delivers the all-important functions at the checkout counter.
3 – Client Tracking – also called Customer Relations management (CRM) this gathers information about customers’ purchases and contact info for use in marketing.
4 – Sales Tracking – provides crucial sales data used in merchandising decisions and collects all the cash flow and sales tax information for the bookkeeper.
5 – Staff Sales Tracking – Creates reports on staff sales performance and their transactions at the point of sale.
6 – Inegrate POS Devices – ties together the barcode scanner, receipt printer, and cash drawer into a smooth customer experience at the checkout.
What functions does point of sale (POS) software provide?
Point of sale (POS) software transforms any PC into a retail management system. It is an important component for the successful operation of a retail business. The most essential functions are:
1 – Managing Inventory – this prevents over and under stock issues and helps manage your investment in inventory.
2 – POS Functions – these provide a good checkout experience at the sales counter for both the customer and the staff.
3 – Customer Relations Management (CRM) – allows you to keep track of individual sales in order to target your marketing efforts in an efficient way.
4 – Cash Flow Management – processes payments and tracks all the information that the bank, accountant and bookkeeper want.
5 – Staff Performance – keeps all the information you need to see what is happening on the sales floor and at the checkout counter.
6 – Invoicing – manages billing and receivables if you have on-account clients.